Bleach stains are a bit tricky because bleach doesn’t “stain” fabric—it actually removes or lightens the dye permanently. So the goal isn’t always to remove the stain, but to restore or disguise the lost color.
Here are 2 practical tricks people use depending on the fabric:
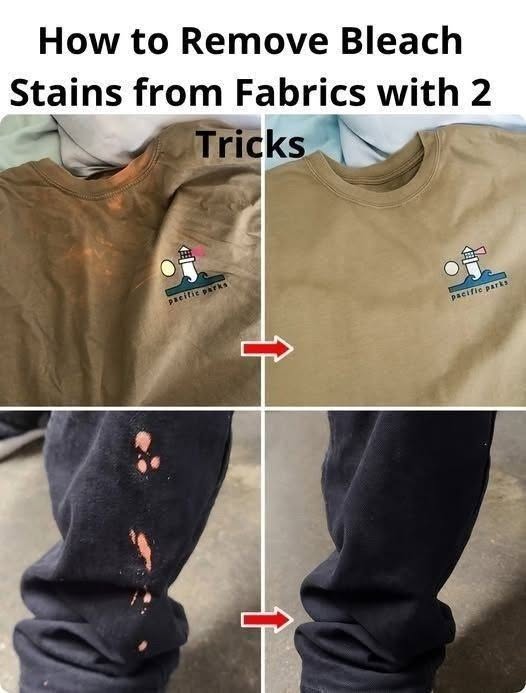
🧴 Trick 1: Fabric dye touch-up (best long-term fix)
This works when the bleach spot is visible but the fabric is still intact.
What you need:
- Fabric dye (matching color) or fabric marker
- Cotton swab or small brush
- Cold water
Steps:
- Wash and dry the fabric first (no detergent residue).
- Lightly dab dye onto the bleach spot using a cotton swab.
- Blend edges outward so it doesn’t form a sharp patch.
- Let it dry fully.
- Wash gently after 24 hours.
👉 Best for: shirts, jeans, cotton fabrics
🎨 Trick 2: “Blend and camouflage” method (no dye needed)
This is a quick fix if you don’t have dye.
Options:
- Fabric marker (for small spots)
- Permanent marker (works only for dark clothes, but less natural)
- Decorative patches or embroidery
Steps:
- Match the color as closely as possible.
- Lightly color the bleached area.
- Blend outward in circular motion.
- Let it dry completely before wearing.
👉 Best for: small spots, casual clothes
🧠 Bonus reality check (important)
- Bleach damage cannot usually be “removed” chemically
- The fiber is still there, but the color is gone
- So repair = recolor or redesign, not true cleaning
⚠️ Avoid these common myths
- Lemon juice ❌ (makes bleaching worse)
- Baking soda ❌ (does not restore color)
- Re-washing ❌ (won’t fix dye loss)
💡 Pro tip
For future accidents, keeping a fabric marker in your clothing color tone is the fastest emergency fix—it hides fresh bleach spots in seconds.
If you want, I can show you how to completely hide bleach stains creatively (tie-dye, patterns, and invisible repair tricks) depending on the clothing type.
